
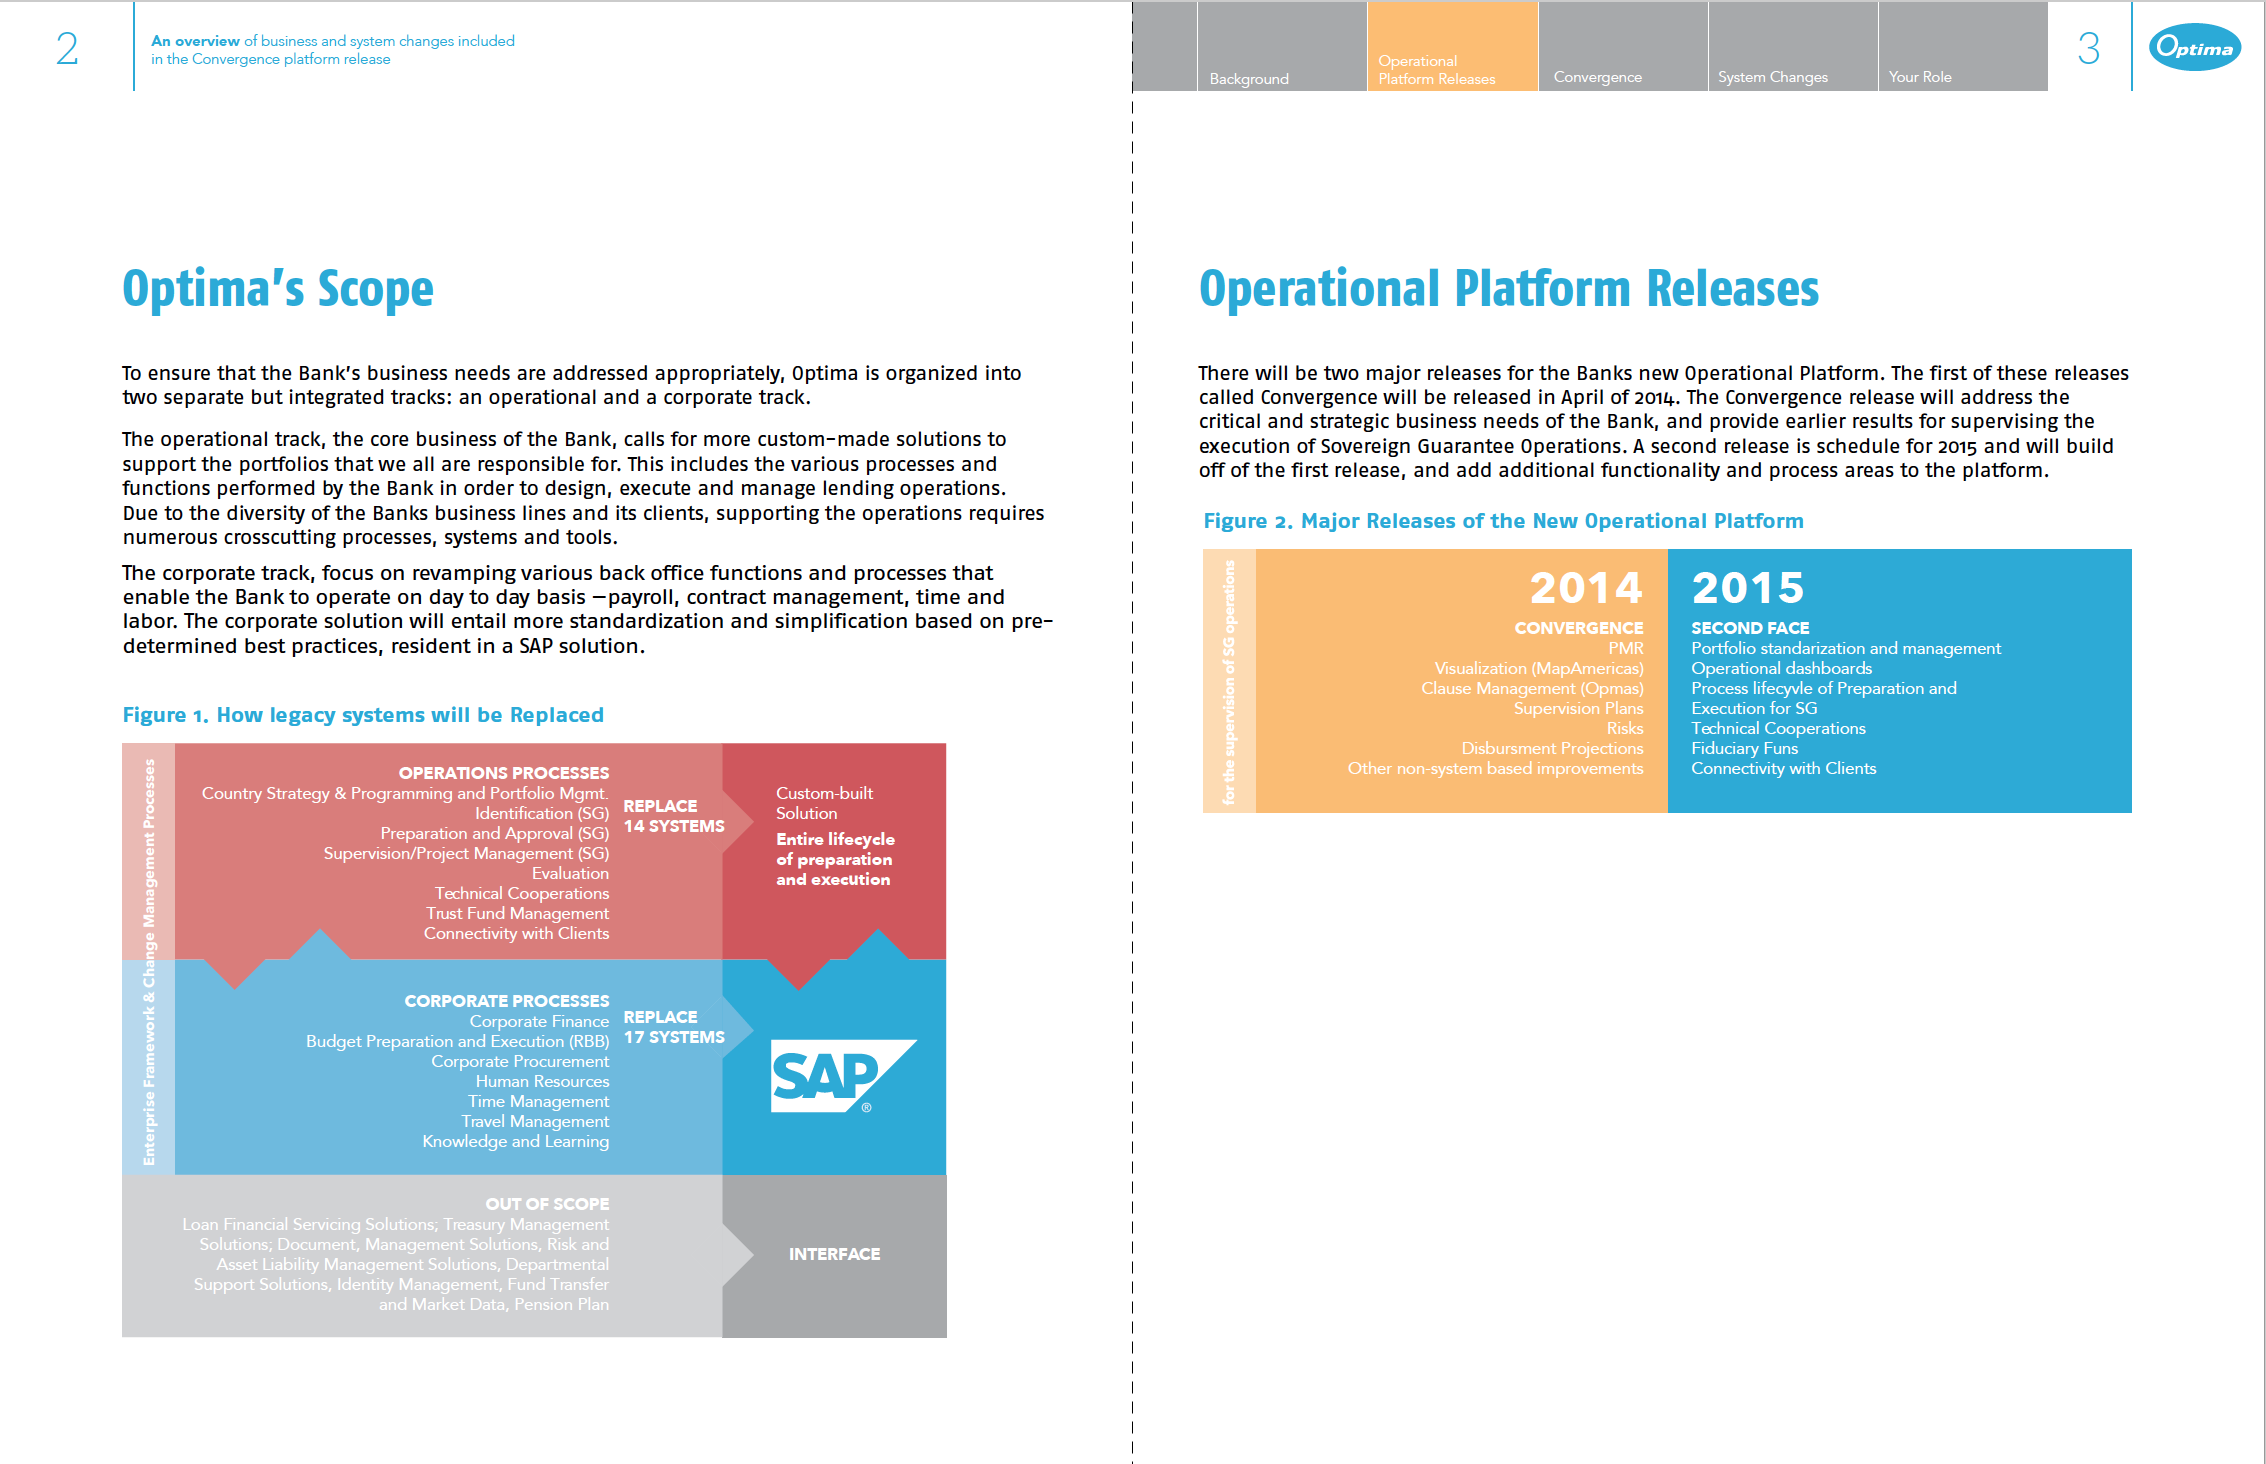
In its early days, Facebook was all about text and links. But as it has grown up, images have become more and more important. They’re now more important for design and identity on the user interface, like your profile picture or cover photo. And it’s a great way to share photos in galleries and on the timeline. Facebook photos are now a huge part of the site’s appeal even as dedicated image apps like have become hugely popular as well.
If you’ve come across this page, you’ve no doubt found out for yourself that working out what image sizes to use on Facebook isn’t as easy as it could be. It involves some wrangling to get the results you want. Each type of image on a page, profile, and timeline has its own size and quirks. And Facebook never has been very good about making its help pages easy to find.
Making things even more fun is that Facebook changes things from time to time, usually without any warning. Sometimes it’s a small, incremental tweak. Sometimes it’s an entire overhaul (such as when timelines were introduced and again when they were changed from two columns to one column). So it’s always a bit of a moving target. And there always seems to be a new system just around the corner.
So whether you’re using Facebook pages for social media marketing or simply trying to post photos for friends and family, here’s my freshly updated 2017 version of the unofficial guide for the sizes of Facebook photos on the various parts of the site.
I try to keep this as up-to-date as possible, but Facebook has a nasty habit of making unannounced changes and then rolling them out gradually to users so that not everyone gets them at once. If you’ve noticed something that’s changed, please let me know in the comments so I can update it.
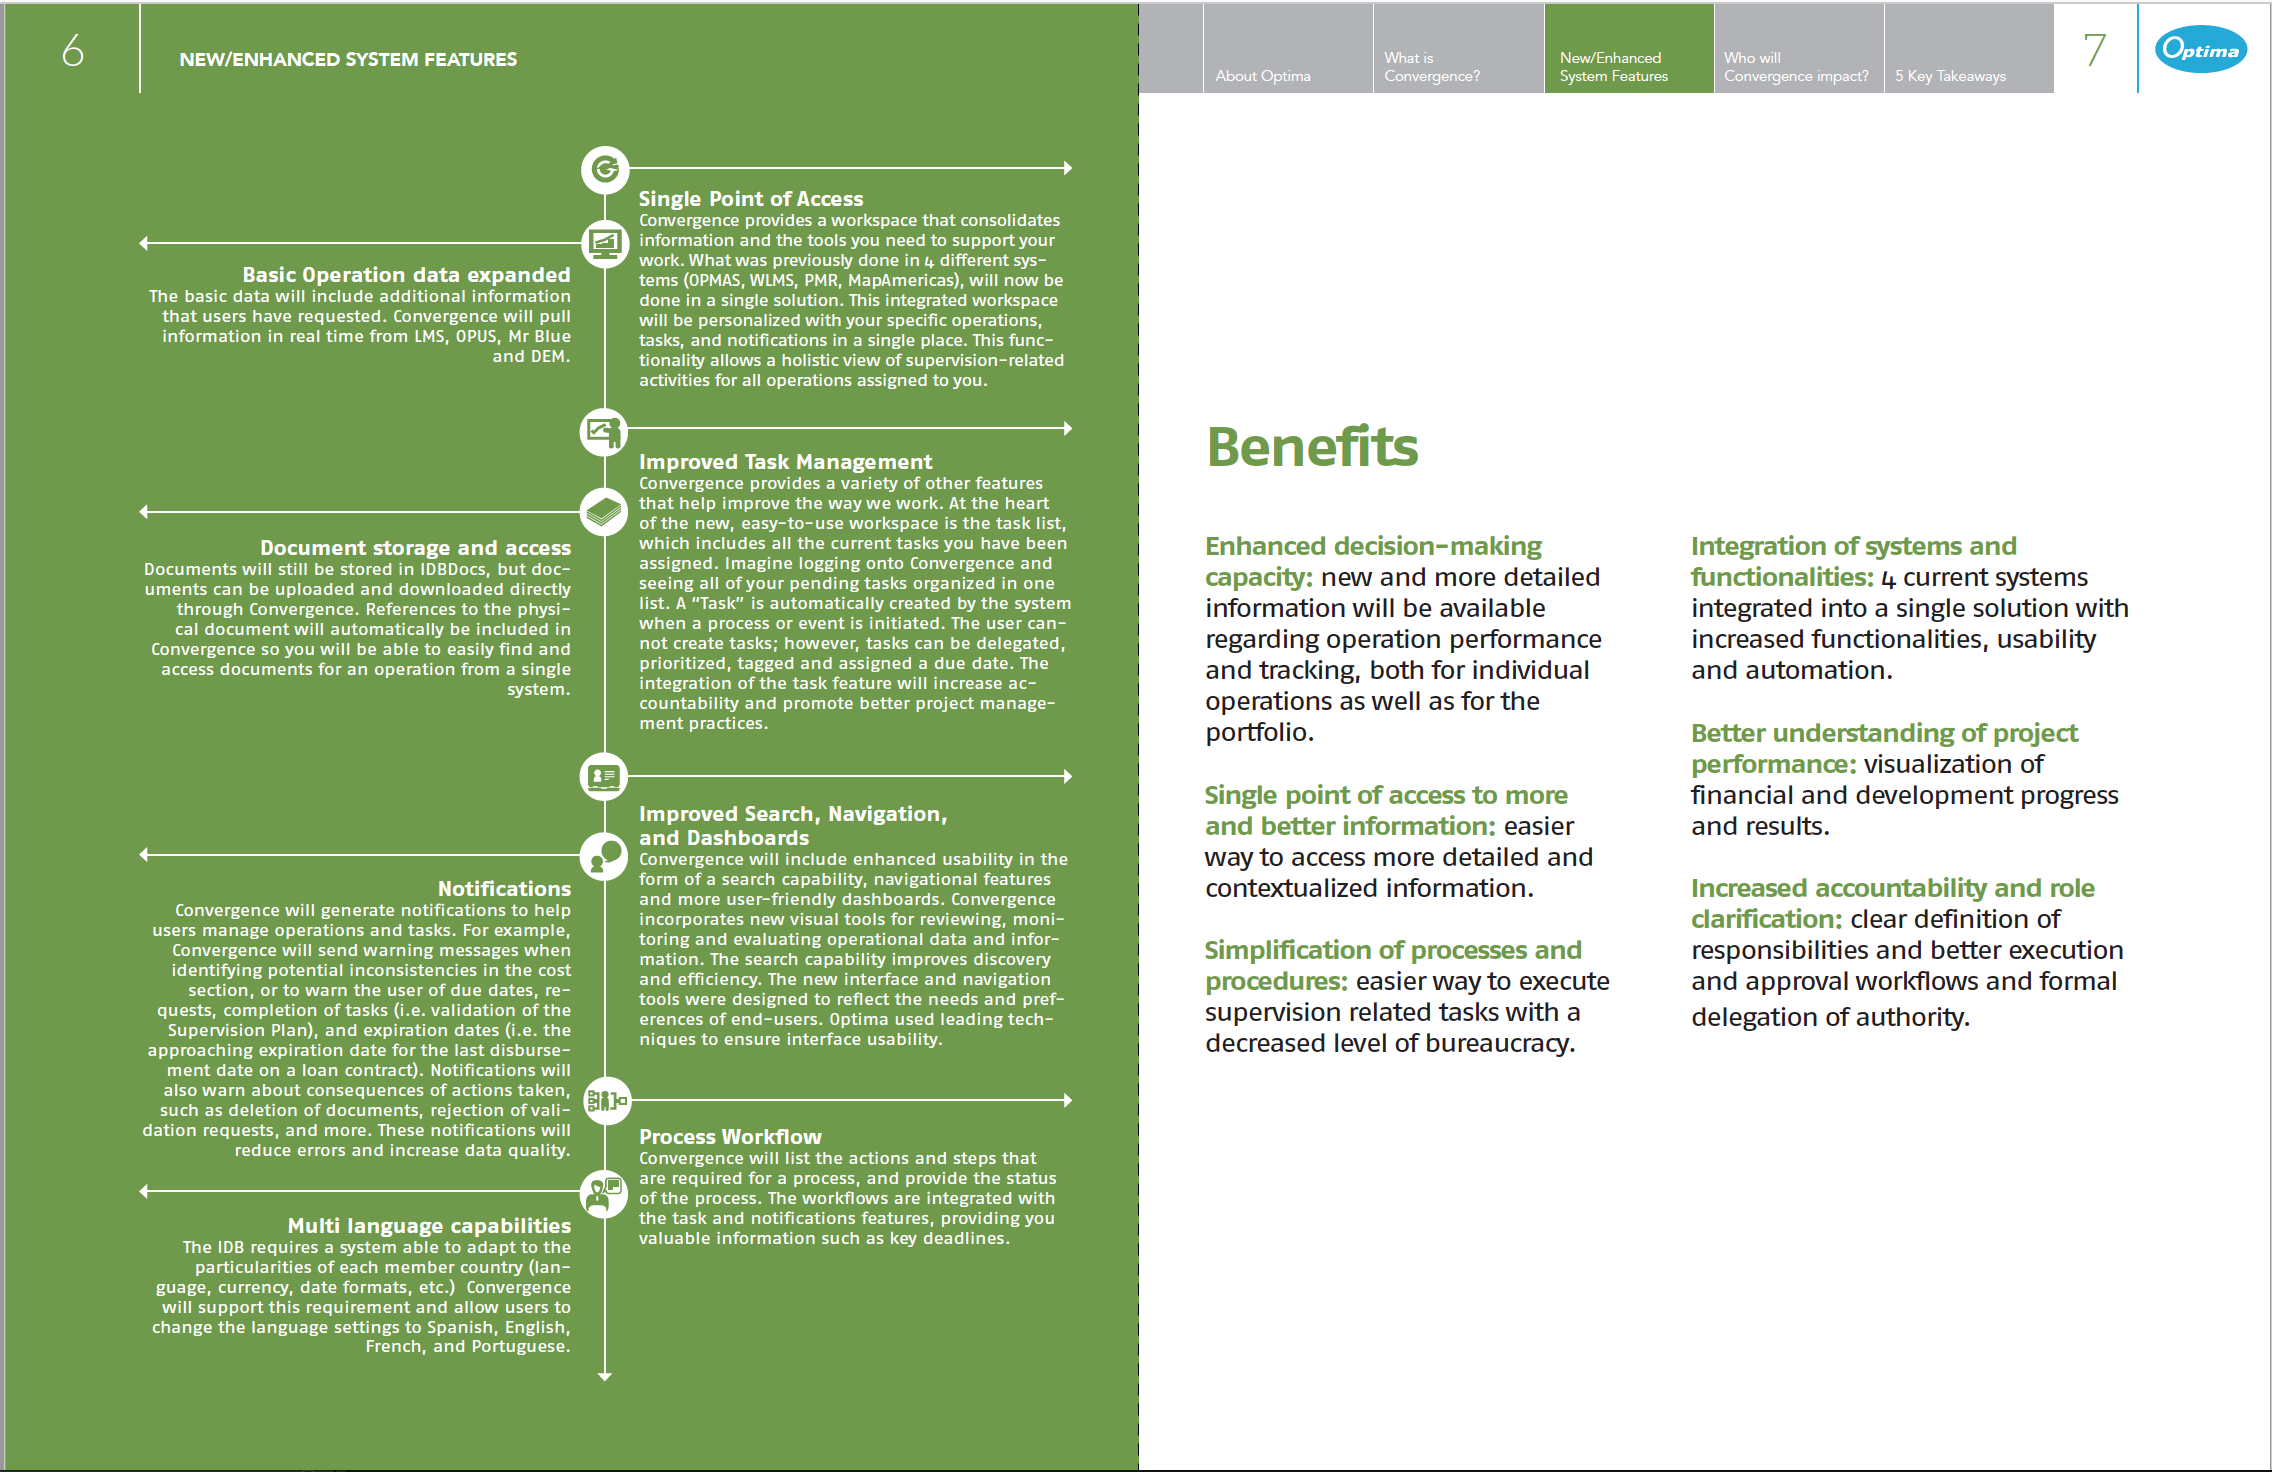
Facebook Cover Photo Size
The Facebook Cover Photo is the large panoramic image space at the top of the timeline.

It’s now displayed at 820px wide by 312px high on computers and 640px by 360px on smartphones.

The image you upload must be at least 399px wide and 150px tall. I recommend uploading ones that are at least 1640px wide and 624px high. a detailed post explaining why.
You can only designate one photo as your Cover Photo. Panoramas are ideal. Simple crops also work.
And there’s nothing stopping you from assembling a collage in your imaging software, saving it as a single image file, and uploading that. Here’s an example using (see for step by step instructions).

And here’s an example using Lightroom (see for step by step instructions).

If you’ve just set up a new Facebook profile or page and don’t yet have a cover photo, just click on the “Add Cover Photo” button at the top of the page where the Cover Photo will go. You’ll then get this warning popup:

Once you’ve added your photo, you can change it easily. When you’re logged in to your account and on the Timeline view, click on the camera icon at the bottom right of the cover photo–you’ll get a flyout link for “change photo.” If you decide you want to reposition or remove the photo, you can use the same menu.
Facebook Profile Picture Size
The Profile Picture is the smaller, square at bottom that’s to the left of the cover photo. It used to overlay the cover photo’s bottom left corner, but in the latest layout it has been moved to it’s own spot in the top left of the page.
Whatever shape image you upload, it will be cropped to a square.
It displays at 170px by 170px on computers and 128px by 128px on smartphones.

If you use a photo that’s not square, you have some control over which part of the image to use for the crop. When you’re logged in, click on the small camera icon at the bottom right of the profile picture–as you hover it will overlay to a “change image” link.
Tip: If you find that your resulting profile picture, after it’s downsized in Facebook, is blurry, try uploading an image twice the size of the downsized image (that is, an image that is 340px by 340px). That should give a sharper result.
Profile Picture on the Timeline
The profile image that appears next to your name on comments and posts is the same image but is automatically scaled down to 40px by 40px.

Shared Link Thumbnails
Some things got simplified in the new layout. didn’t. But they’ve been improved on the previous version, and we also get some nifty new features like being able to upload a different thumbnail image and use multiple thumbnails that all link back to the shared URL. (I have a separate post on .)
The simplest layout is with a single image. It’s scaled to fill a box 476px by 249px. Like this:

A new feature is that you can include multiple thumbnails, each of which is linked back to the URL you’re sharing. They’re cropped to squares that are 300px by 300px and displayed as horizontal carousel. Like this:

One Photo on the Timeline
When you upload an image to the timeline, a thumbnail is generated automatically to fit within a box that is 476px wide and up to 714px tall. So if you want to use the maximum space available, upload an image in portrait orientation (vertical) that is in the ratio of 3:2.

If you upload a landscape (horizontal) image, it will be scaled to 476px wide and retain its shape. This, for example, is a rectangle in landscape orientation that’s in the aspect ratio of 3:2. The full area of the image appears.

This is another rectangle in landscape orientation, but it’s a much narrower aspect ratio like a banner or panorama. The width is again 476px and the image is scaled so that the entire image area appears.

If you upload that same image rotated 90 degrees, so that it’s tall rather than wide, it will be cropped to the maximum available area of 476px by 714px.
And if you upload a square, the whole image will be displayed, with the width at 476px.

Uploading Multiple Images to a Page Timeline
You can upload multiple photos at once to the timeline. How they’re displayed depends on how many images you’re uploading and the orientation of what I will call the primary image.
The primary image is what I’m calling the one that displays first in the uploading popup, and it also displays larger in some of the layouts. So far as I know there’s not an official name for it, but I’m going to go ahead and use primary image.
As well as displaying first, the primary image has another important role. It determines the layout you get. If you upload 3 images with a square primary image you’ll end up with a different layout than if you upload 3 images with a rectangular primary image.
The easiest way to select which image serves as the primary image is to drag it to the left in the upload dialog.
Here’s an example of what I mean. In this one, I’m uploading two images, a red square and a green portrait rectangle. If the red square is in the first position, like this:

it posts like this:

Uploading exactly the same two images but reversing them, so that the portrait rectangle is first, like this:

displays like this:

The same principle applies if you’re uploading two, three, or four images–the layout will always take its cue from the primary image.
2 Images With Horizontal (Landscape) Primary Image
The full width becomes 476px and the height is cropped to 237px.

2 Images With Vertical (Portrait) Primary Image

2 Images With Square Primary Image

3 Images With Horizontal (Landscape) Primary Image

Because the layout takes its cue from the primary image, you can mix and match the orientations of the non-primary images–they’ll still display the same.
3 Images With Vertical (Portrait) Primary Image

3 Images With Square Primary Image

4 or More Images with a Horizontal (Landscape) Primary Image

You can mix and match the orientations of the non-primary images–they’ll still display the same.
If you upload 5 images or more, it displays only the first 4 images but will add an overlay to the bottom right thumbnail with the number of images that are not displayed (eg. +2 or +4, etc). Like this:

4 or More Images with a Vertical (Portrait) Primary Image

4 or More Images with a Square Primary Image

Full-Width Photos on the Timeline
Yes, they were cool. The image spanned both columns. But Facebook did away with them in their redesign in mid-2014. Your updates now only show in a single column, and there’s no way to make photos wider than that column.
Event Header Images
No matter what shape image you upload as a header image for an even post, it’ll be cropped to an aspect ratio of 16:9. For best results, upload an image that’s 1920 by 1080 pixels. But something to watch out for is that in the main event view it’s scaled down quite a lot, so don’t use fonts that are too small (people can click on the image to open a larger version, but not everyone is going to do that).
When it’s displayed on the main event page it’s scaled to 500 by 262 pixels, like this:

Metadata
While not specifically related to image sizes, it is worth knowing that Facebook strips out all metadata from your images. That includes all GPS, camera type, and other data that your camera might embed, as well as anything like keywords or copyright information you might have added. (An exception is if you’re in ).

Author: admin
I am the creative director at IGRAPHI and an award winning designer and web developer with 20 years of experience conceiving and implementing design and technical solutions across traditional, digital, and social media platforms to effectively engage target audiences with clients’ messages and products. Built and managed brands from the ground up, worn every hat on the rack, one brand at a time.


