

Facebook‘s user interface is not what you’d call a designer’s dream. Flying in the face of the trend towards customization, it has remained perversely and stubbornly enamored of its simple, lowest-common-denominator aesthetic.
The layout is frustratingly rigid and idiosyncratic, and users are given very little control over the look and feel of their profiles or pages.
Facebook can be a great way to share photos with people you know, especially if you want them actually seen. And Facebook itself is evidently increasingly seeing the value of photos as content, especially when people tag people and places. In recent years, it has become the largest online photo storage site by far, and is now much bigger than the previous kings of the roost, Flickr and Photobucket. The new player on the scene, Google+, is arguably even better for displaying and sharing photos, but it still doesn’t have anywhere near the volume or reach of Facebook.
It’s getting more photo- and graphics-friendly, if ever so slowly.
There are a few different ways of using images and photos on Facebook.
Some are for design and identity on the user interface, such as the
profile picture and link thumbnails to display on your profile or page
and wall. It’s also a great place to share photos. (But be sure to read
the terms of service before diving in–see below.)
And now that Timeline is getting activated for all users in their
personal profile (but not yet for product or business pages), there’s a
new set of variations. To make best use of the graphic elements you can
control it’s very helpful to know what dimensions constraints you have
to work within. I’ve found Facebook’s own help pages are frustratingly
fragmented and sometimes obtuse. So I thought I’d try to put all the
image and graphics dimensions specs together. These are a bit of a
moving target—Facebook changes things from time to time, typically with
little notice—but I’ll try to keep these up to date.
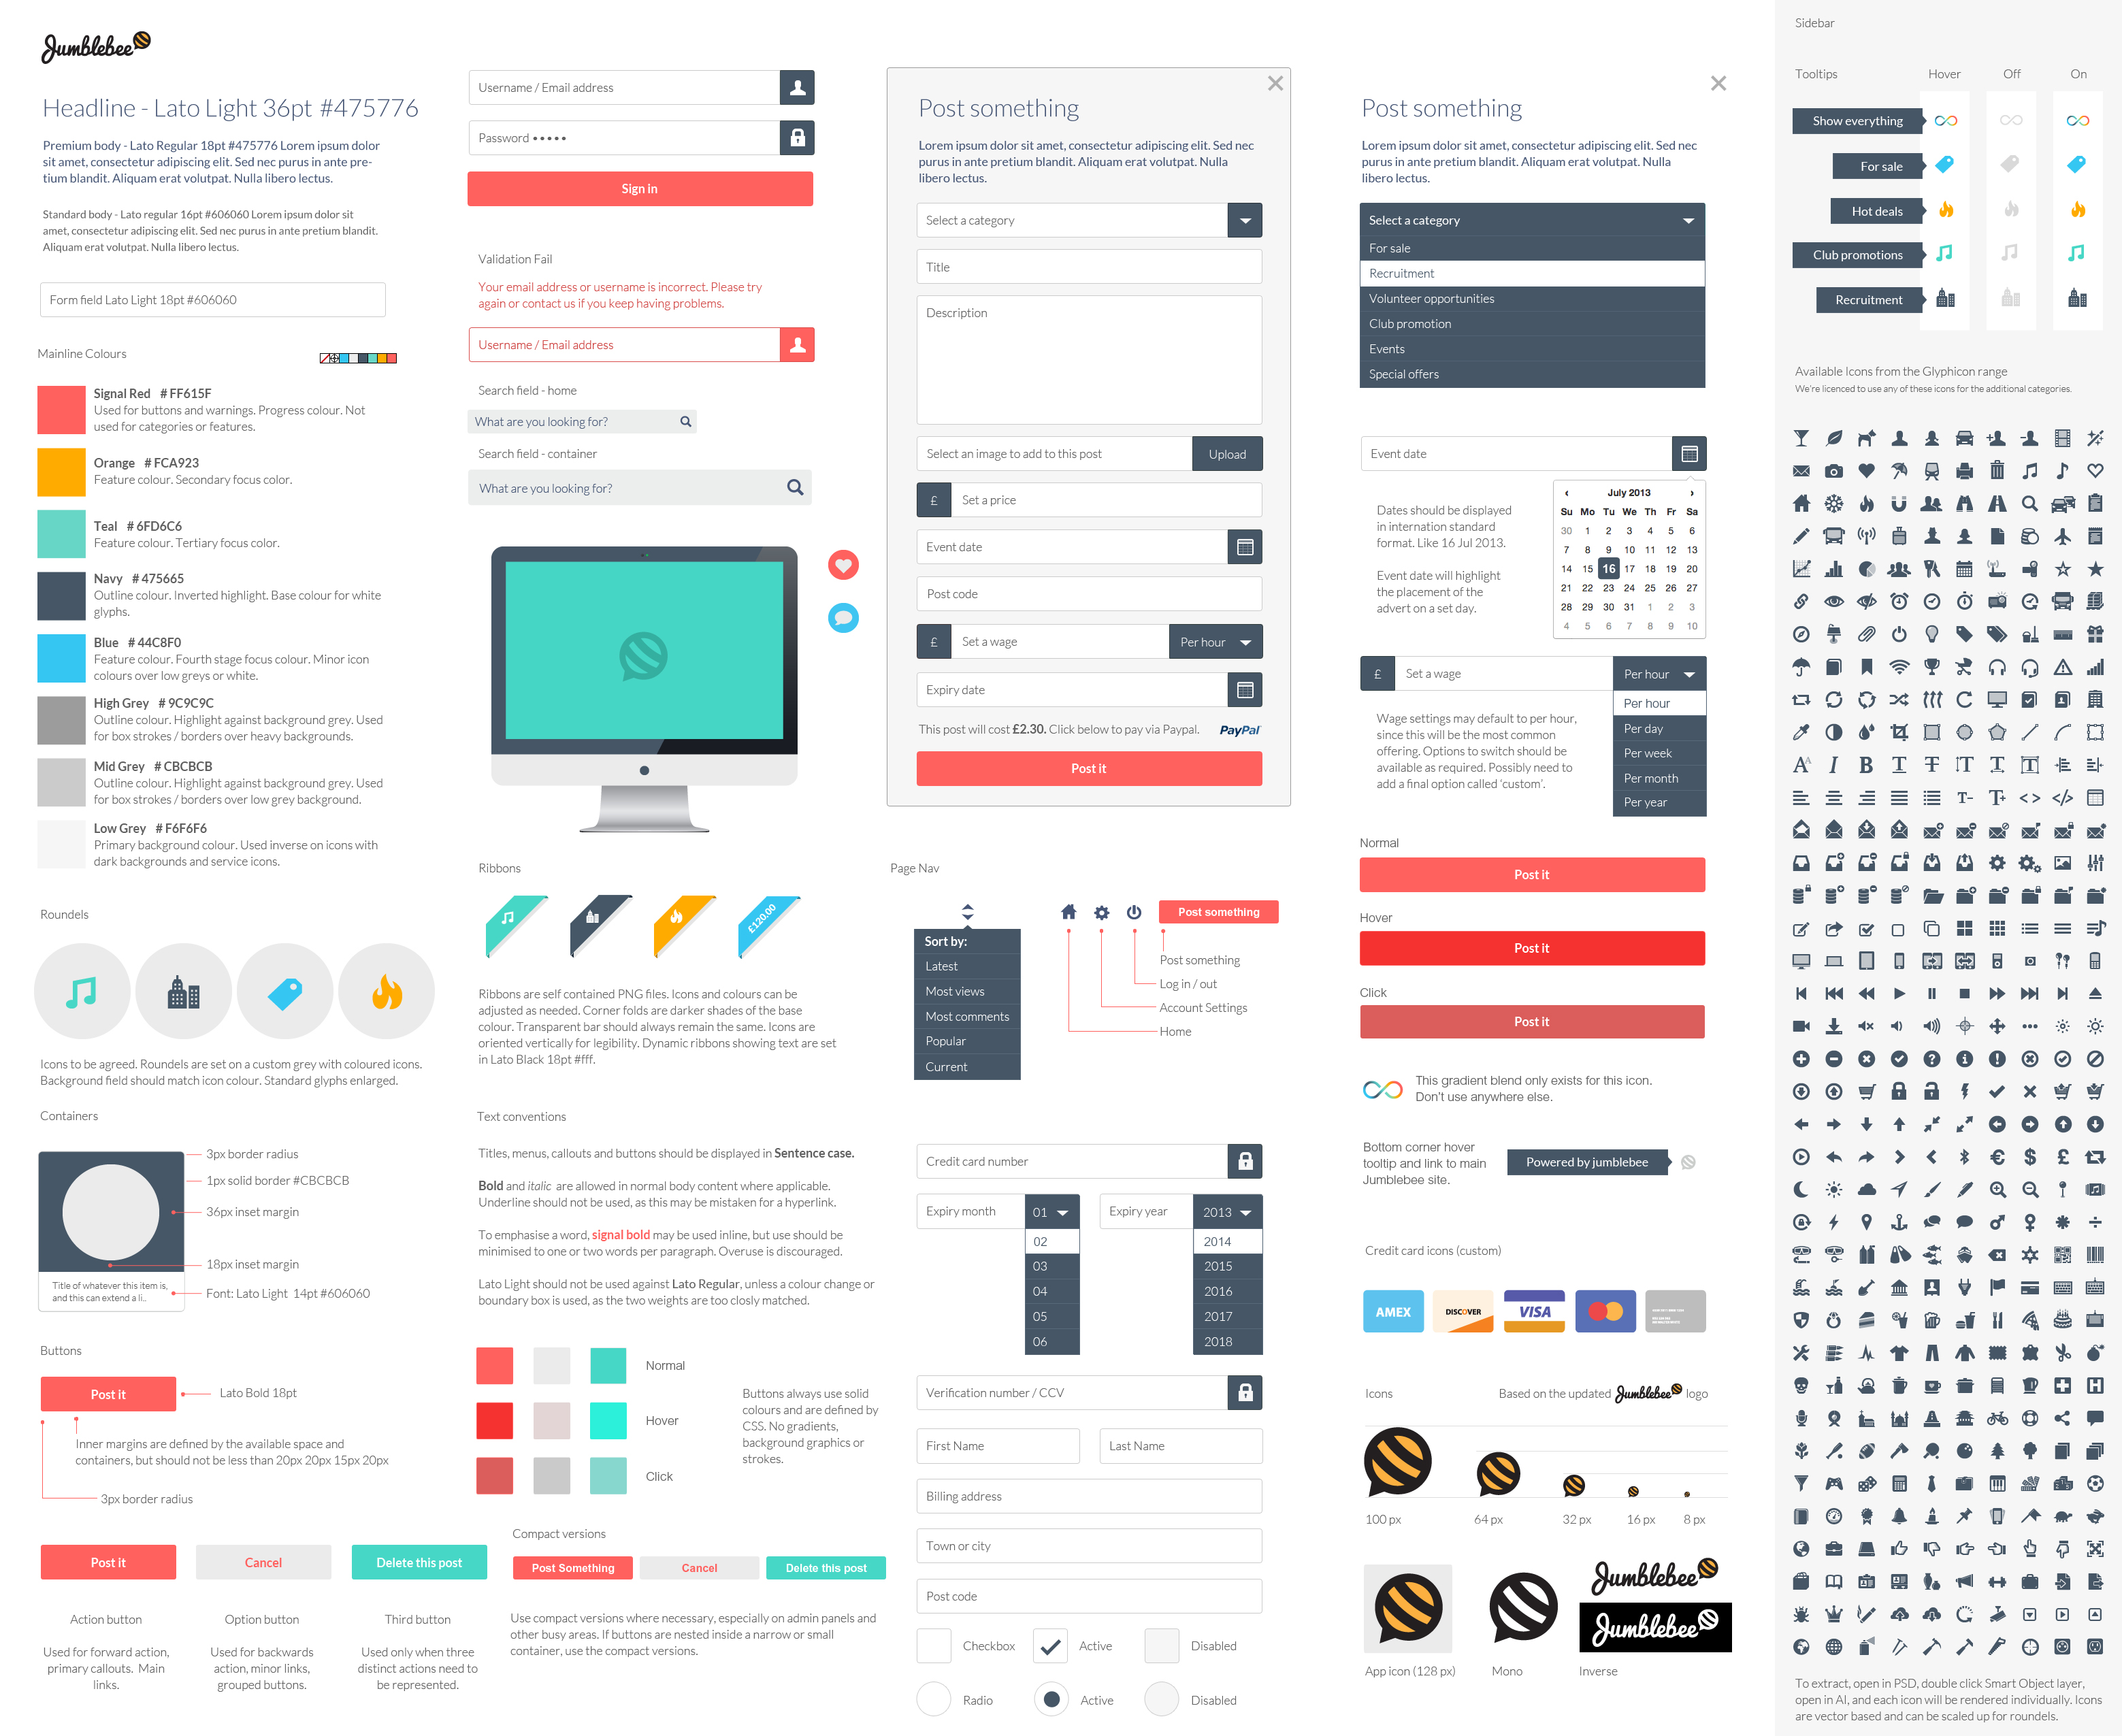
| Width | Height | Notes | |
| Cover Photo | 851px | 315px | |
| Profile Image | 180px | 180px | Scaled down automatically to 32x32px |
| Link Thumbnail | 90px | 90px | |
| Uploaded Photos | 2048px | 2048px | |
| Displayed Photos | 960px | 720px | |
| Pinned Post | 403px | 403px | |
| Application Favicon | 16px | 16px | |
| Application Icon | 110px | 74px | Size limit of 5MB |
| Milestone Picture | 843px | 403px |
Timeline Photos
There are two main images you can control on the new Timeline view, the Cover Photo and the Profile Image.
Cover Photo
Facebook calls the large, panoramic image space at the top of the
timeline is called the Cover Photo. In the example at the top of this
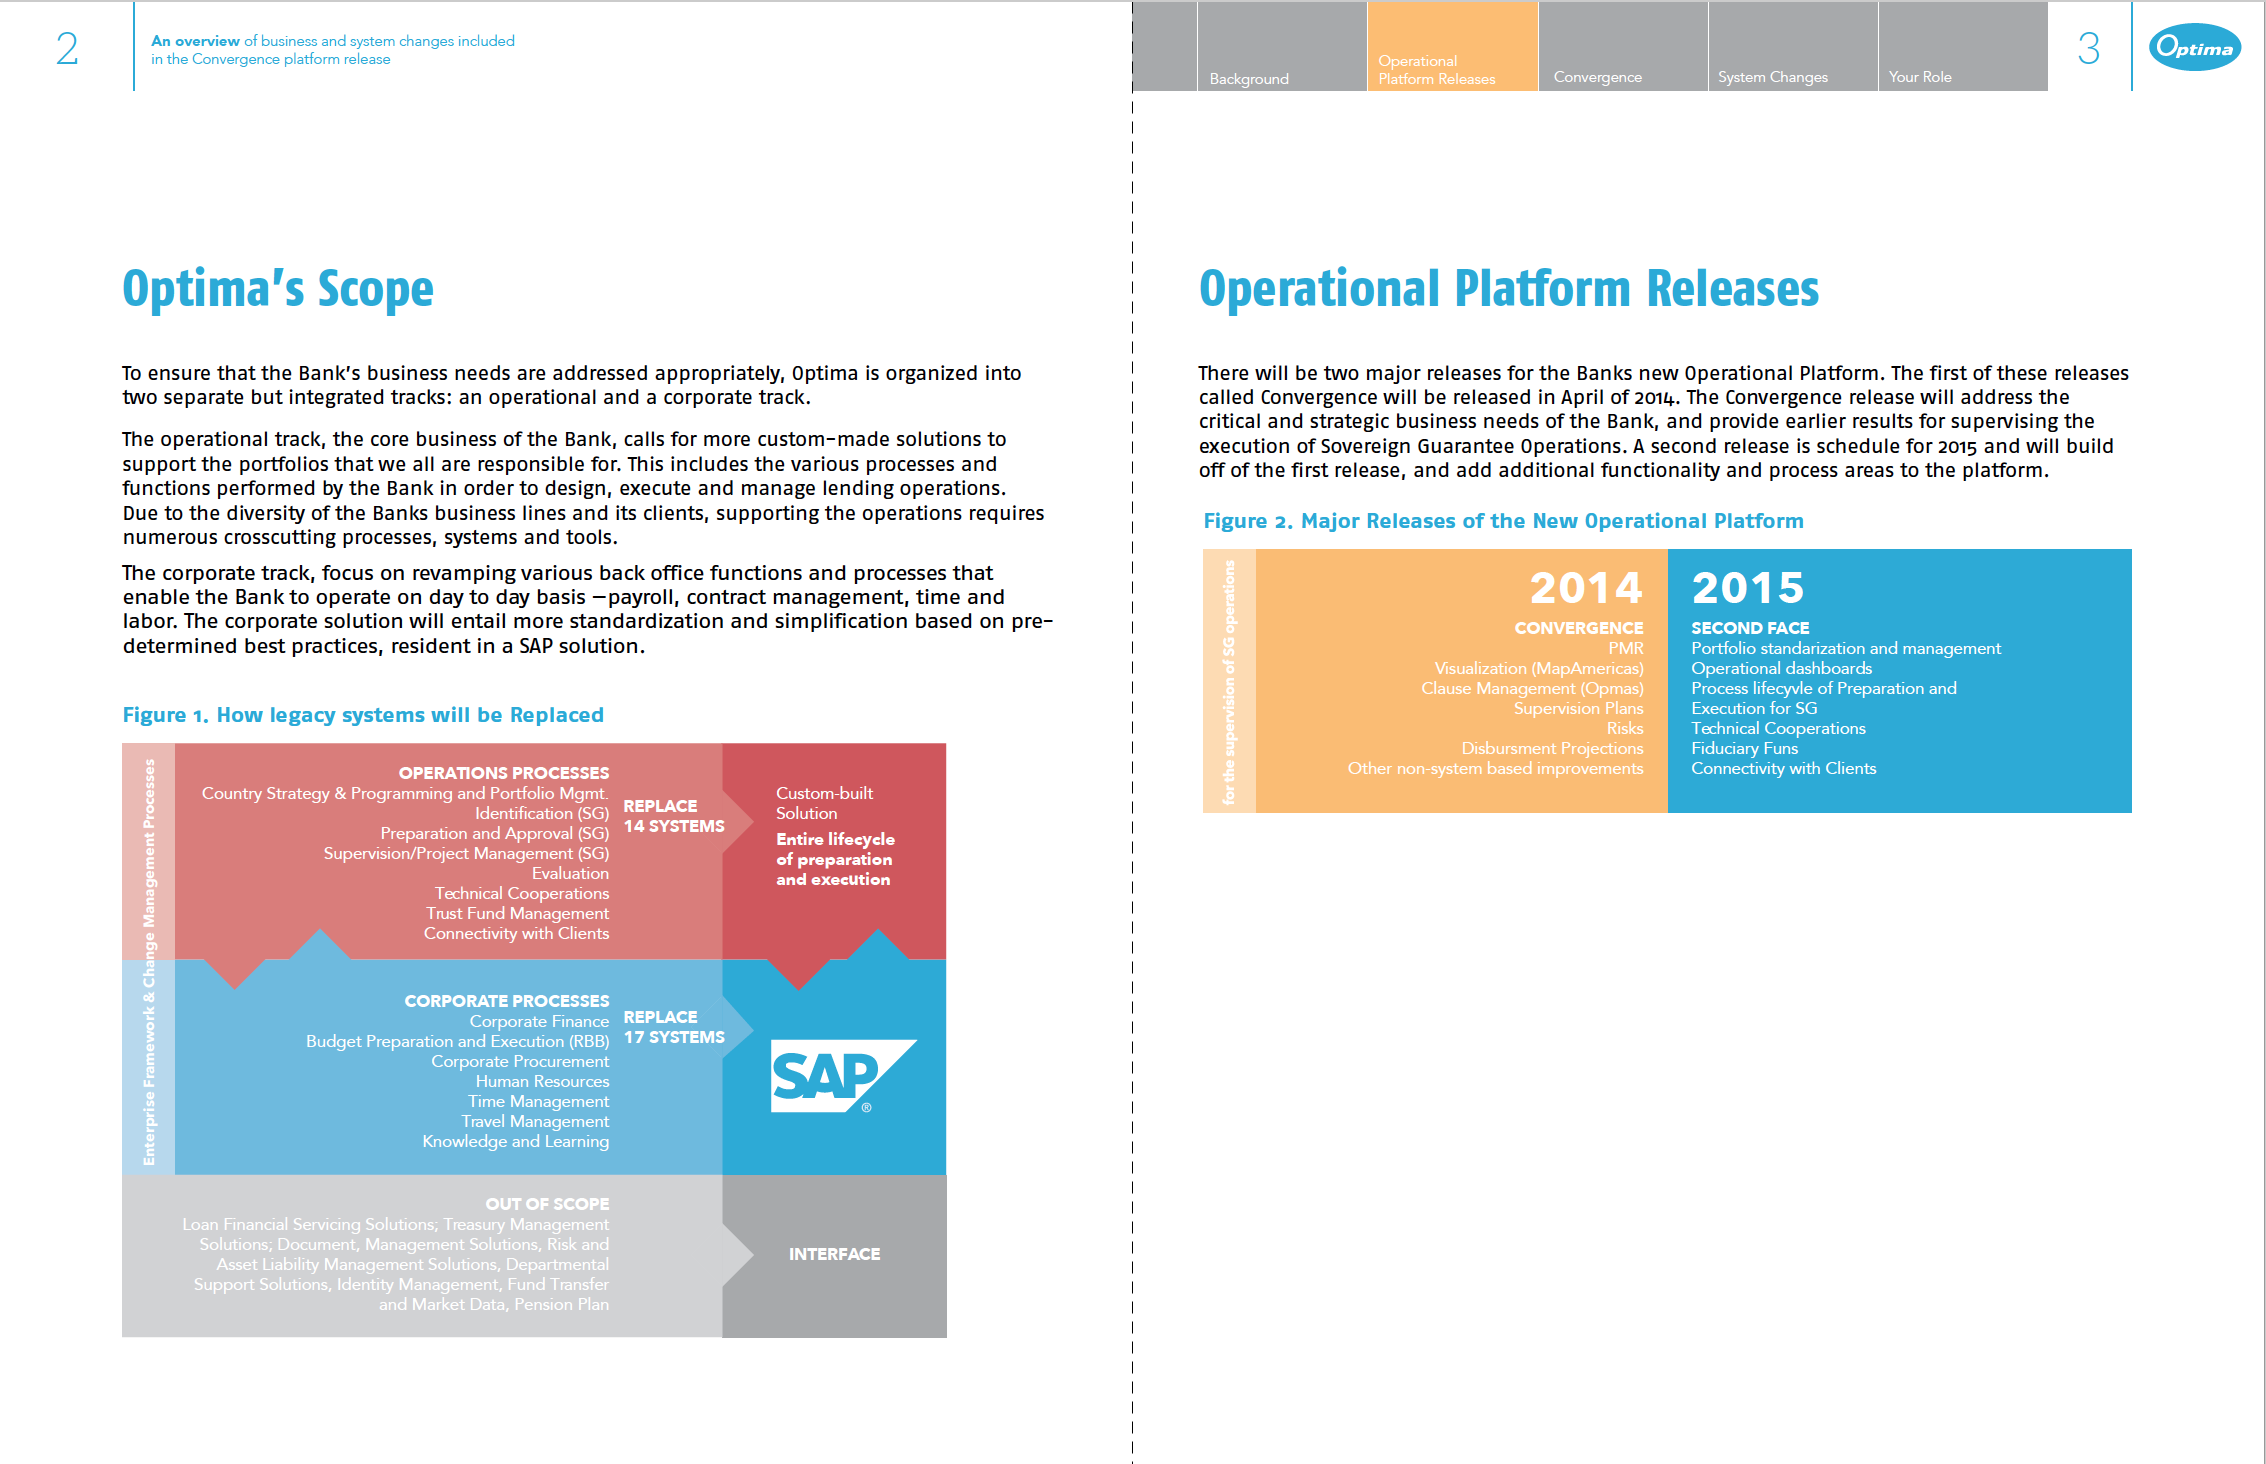
page, it’s a picture of the Informational folder, a part of the umbrella designs for the World Bank’s Business Intelligence Department.
Facebook does impose some restrictions on what you use for the Cover
Photo. It can’t be primarily text or contain contact information that
should be in your “About” section. You also, of course, can’t infringe
anyone else’s copyright with it. You can read more of Facebook’s
restrictions here.
The final display image comes out at 851 pixels wide by 315 pixels high. Facebook’s
help pages recommend that you use an image that is at least 720 pixels
wide.You can upload an image already cropped and resized to precisely
those sizes (here’s how if you’re using Lightroom).
Or you can upload a larger image, in which case you’ll be given a
chance to move the image to display the part you want–basically forced
cropping.
You can only designate one photo as your Cover Photo. Panoramas are
ideal, but there’s nothing stopping you from assembling a montage in
your imaging software, saving it as a single image file, and uploading
that.
When you first convert your profile to the Timeline, you won’t have a
cover photo. To add one, just click on the Add Covert Photo button at
the top of the page where the Cover Photo will go. You’ll then get this
warning popup:

Once you’ve added your photo, you can change it easily. When you’re
logged in to your account and on the Timeline view, if you hover the
mouse over the Cover Photo you should get a “Change Cover” button at the
bottom right of the Cover Photo. Click on that and you’ll get the menu
item to choose where photo comes from. You can choose from existing
photos you’ve uploaded to Facebook or upload a new one. And if you
decide you want to reposition or remove the photo, you can use the same
menu. It looks a little something like this:

Something to be aware of is that Facebook compresses uploaded Cover
Photos pretty aggressively when you upload them. It makes
sense–naturally, they want to speed page loads and reduce bandwidth by
applying as much compression as they can get away with. To my mind, they
compress too much, but how noticeable it is will depend on whether
things like the range of colors in your image and amount of detail in
your photo. In the examples above, the JPEG compression is far more
noticeable in the montage version than in the Sydney Harbour Bridge
version. I set the quality and sharpening settings the same for each in
the originals before they were uploaded.
Profile Image
The Profile Image is now the smaller, square at bottom left. In the
examples above, it’s my shadow. It’s final display dimensions are 160 pixels by 160 pixels. The white border is added automatically.
Link Thumbnails
 Maximum Image Dimensions: 90 pixels by 90 pixels These
are the small icons you can choose when adding a link to your wall. If
you’re posting the link through Facebook itself and the linked page
includes photos, you’ll be given options taken from the graphics or
photos on the linked page. Use the arrows to choose a thumbnail or check
the box for no thumbnail. Through Facebook itself, you can’t upload
your own image to use, but you can if you use Post It At(Post It At only works for pages, not for personal profiles).
Uploaded Photos
Maximum Image Dimensions: 2048 px X 2048 px
Facebook recently increased the size of the photos significantly. It
also added a javascript Lightbox viewer, a simple but stylish way to
display images and associated comments. The folks over at PetaPixel have
put together a nifty graphicto
visualize the changes in Facebook image sizes. When you upload a photo
through Facebook’s inbuilt image uploader you get the option to control
to some extent who can see the photo. You can customize by location and
language, but there’s no simple way to control if you only want to share
the photo with Aunt Gertrude and no-one else. And there’s no way to
switch off the download link–if people can see your photos, they can
download the original version you uploaded–you can’t specify things like
allowing only low-res downloads. And if you really want to control who
can see the photos you’re going to have to wade into the convoluted and
often counter intuitive way Facebook deals with privacy settings on your
account.
How to Change Your Profile Picture Thumbnail
Your
profile picture thumbnail is the small, square image that’s used around
the site next to your comments or other site activity. It’s taken from
your profile image–you can’t have separate images for your profile image
and your profile thumbnail.
You don’t have a whole lot of control over the way the thumbnail displays, but you do have a little bit.
First, make sure you’re signed in to Facebook and looking at your own
wall. Then hover the cursor over your profile image at top left and
you’ll see a “Change Picture” button appear at top right of the image.
You can also use the “Profile Picture” item from the menu below the
image.
When you click on that you’ll get a screen with your image at left
and options to add a new image at right. But under your existing image,
there’s a tiny “Edit Thumbnail” link. When you click on that, you get a
popup that looks like this: 
If you put the mouse over the small image square, click and hold and
drag, your can move it up and down to choose different parts of the
image. You can also use the “Scale to fit” option to fit the entire
image in that tiny square (that doesn’t work very well for tall profile
images like I’m using here). When you click Save, it’ll update every
thumbnail next to your comments through Facebook automatically.
Facebook’s Terms of Service
Just because you can add photos to Facebook doesn’t necessarily mean
you should immediately start uploading your entire image archive.
Facebook’s terms of service are closely watched and often controversial. So I’d definitely recommend reading the TOS
carefully before uploading to see whether it fits with what you want to
do. If you’re a stock photographer that needs to control dissemination
(eg. if you have an exclusive contract with an agency)
you’ll want to look into this very carefully before uploading any
photos that might cause a conflict. At the time of writing, the terms
pertinent to sharing photos are:
Sharing Your Content and Information
You own all of the content and information you post on Facebook, and
you can control how it is shared through your privacy and application
settings. In addition:
- For content that is covered by intellectual property rights, like
photos and videos (“IP content”), you specifically give us the following
permission, subject to your privacy and application settings: you grant
us a non-exclusive, transferable, sub-licensable, royalty-free,
worldwide license to use any IP content that you post on or in
connection with Facebook (“IP License”). This IP License ends when you
delete your IP content or your account unless your content has been
shared with others, and they have not deleted it.- When you delete IP content, it is deleted in a manner similar to
emptying the recycle bin on a computer. However, you understand that
removed content may persist in backup copies for a reasonable period of
time (but will not be available to others).- When you use an application, your content and information is shared
with the application. We require applications to respect your privacy,
and your agreement with that application will control how the
application can use, store, and transfer that content and information.
(To learn more about Platform, read our Privacy Policy and Platform
Page.)- When you publish content or information using the “everyone”
setting, it means that you are allowing everyone, including people off
of Facebook, to access and use that information, and to associate it
with you (i.e., your name and profile picture).- We always appreciate your feedback or other suggestions about
Facebook, but you understand that we may use them without any obligation
to compensate you for them (just as you have no obligation to offer
them)
Again, it’s a bit of a moving target–Facebook updates its terms from time to time–so be sure to check the current, full version.
And it’s also entirely possible that the terms will change at some
point after you’ve uploaded the images. Oh, and while you’re at it, why
not use the panel at right to “Like” my Facebook page so you’ll be sure to get more handy hints like these.
Related articles across the web


Author: admin
I am the creative director at IGRAPHI and an award winning designer and web developer with 20 years of experience conceiving and implementing design and technical solutions across traditional, digital, and social media platforms to effectively engage target audiences with clients’ messages and products. Built and managed brands from the ground up, worn every hat on the rack, one brand at a time.


